Are you ready to dive into the world of IoT and AWS? If you're looking to remotely SSH to an IoT device using AWS, you're in the right place. This guide will walk you through every step, from setting up your environment to troubleshooting common issues. Whether you're a beginner or a seasoned pro, this article has got you covered. So, let's get started!
Connecting to IoT devices remotely via SSH on AWS is more than just a technical skill—it’s a game-changer for modern developers and engineers. With the rise of cloud computing and smart devices, mastering this process can unlock endless possibilities for your projects. From home automation to industrial IoT applications, AWS provides the tools you need to manage devices securely.
But hold up—before we jump into the nitty-gritty details, let me ask you something. Have you ever faced challenges while trying to establish a secure SSH connection to your IoT device? Don’t worry; we’ve all been there. That’s why I created this comprehensive guide—to help you avoid common pitfalls and ensure a smooth setup process. Let’s make it happen!
Read also:What Happened To Trey Gowdys Nose Unveiling The Truth Behind The Controversy
What Is SSH and Why Use It for IoT Devices?
SSH, or Secure Shell, is like your secret handshake with remote servers and devices. It allows you to securely communicate with them over unsecured networks. When it comes to IoT devices, SSH offers a reliable way to access and manage these gadgets without exposing sensitive data.
Why should you care about SSH for IoT? Well, imagine being able to troubleshoot issues, update firmware, or monitor performance from anywhere in the world. Sounds pretty cool, right? AWS amplifies this capability by providing robust infrastructure and tools to simplify the process.
Benefits of Using SSH for IoT on AWS
- Enhanced security through encrypted connections
- Scalability to handle multiple devices
- Integration with AWS services for seamless management
- Cost-effective solution for remote access
So, if you’re serious about building scalable IoT solutions, leveraging SSH on AWS is a no-brainer. Let’s move on to the next section where we’ll explore the setup process in detail.
Setting Up Your IoT Device for Remote SSH Access
Before you can remotely SSH to your IoT device, you need to set it up properly. This involves configuring the device, ensuring network connectivity, and setting up the necessary credentials. Follow these steps to get your device ready:
Step 1: Choose the Right IoT Device
Pick an IoT device that supports SSH and is compatible with AWS. Popular options include Raspberry Pi, ESP32, and BeagleBone. Make sure your device has enough resources to handle SSH connections efficiently.
Step 2: Install an Operating System
Most IoT devices require an operating system to function. For example, Raspberry Pi often runs on Raspbian or Ubuntu. Ensure that the OS supports SSH and is updated to the latest version.
Read also:Cupshe Returns The Fashion Phenomenon Thats Back In Style
Step 3: Enable SSH on Your Device
Enabling SSH depends on your device and operating system. On Raspbian, you can enable SSH by running the following command:
sudo systemctl enable ssh
Once enabled, restart your device to apply the changes.
Connecting Your IoT Device to AWS
Now that your IoT device is ready, it’s time to connect it to AWS. This step involves creating an AWS account, setting up an EC2 instance, and configuring security groups.
Step 1: Create an AWS Account
If you don’t already have an AWS account, head over to the AWS website and sign up. AWS offers a free tier for new users, which is perfect for testing and learning purposes.
Step 2: Launch an EC2 Instance
EC2 instances act as virtual servers in the AWS cloud. To launch one, follow these steps:
- Log in to your AWS Management Console
- Go to the EC2 dashboard
- Click on "Launch Instance" and choose an AMI (Amazon Machine Image)
- Configure the instance settings and review the details
- Launch the instance and download the key pair
Step 3: Configure Security Groups
Security groups act as firewalls for your EC2 instances. To allow SSH access, you need to configure the security group settings:
- In the EC2 dashboard, navigate to "Security Groups"
- Select your instance’s security group
- Add a rule for SSH (port 22) and specify the IP address range
With these settings in place, your IoT device can now communicate securely with your EC2 instance.
Establishing a Secure SSH Connection
Once your IoT device and AWS environment are configured, it’s time to establish a secure SSH connection. This involves using the correct credentials and tools to access your device remotely.
Step 1: Generate SSH Keys
SSH keys provide a secure way to authenticate your connection without passwords. To generate SSH keys, use the following command:
ssh-keygen -t rsa -b 4096 -C "your_email@example.com"
This will create a public and private key pair. Copy the public key to your IoT device:
ssh-copy-id user@iot_device_ip
Step 2: Connect Using SSH
With the keys in place, you can now connect to your IoT device using SSH. Open your terminal and run:
ssh user@iot_device_ip
If everything is set up correctly, you should gain access to your device’s shell.
Best Practices for Secure IoT SSH Connections
Security is paramount when dealing with IoT devices. Here are some best practices to keep your connections safe:
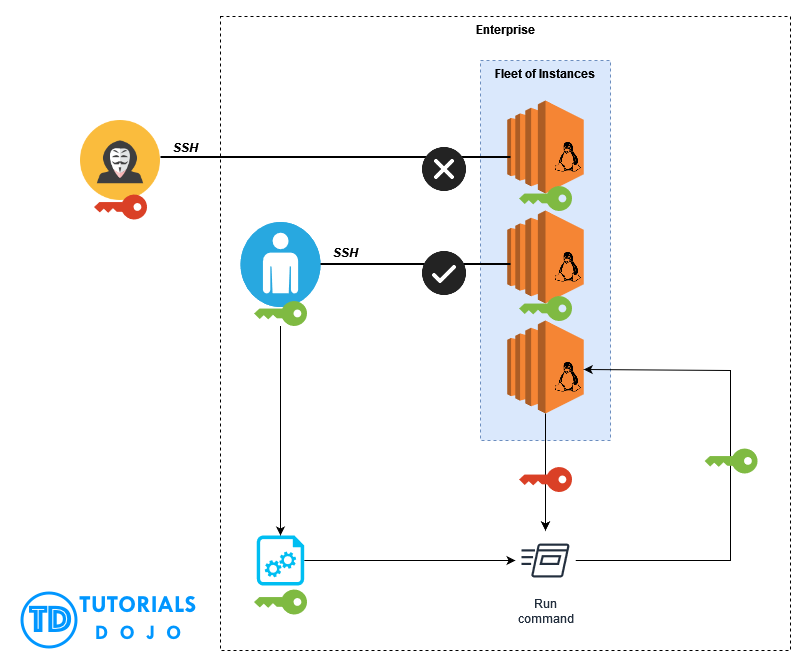
- Use strong, unique passwords or SSH keys
- Disable password authentication if possible
- Limit SSH access to specific IP addresses
- Regularly update your device’s firmware and software
By following these practices, you can minimize the risk of unauthorized access and ensure the integrity of your IoT setup.
Troubleshooting Common Issues
Even with careful planning, issues can arise when setting up SSH for IoT devices. Here are some common problems and how to fix them:
Problem 1: Connection Refused
If you receive a "Connection refused" error, check the following:
- Ensure the SSH service is running on your device
- Verify the security group settings in AWS
- Check the device’s IP address and network configuration
Problem 2: Permission Denied
A "Permission denied" error usually indicates an authentication issue. Try the following:
- Make sure the correct SSH key is being used
- Check the file permissions for your private key
- Ensure the public key is correctly installed on the device
By addressing these issues, you can resolve most connection problems and enjoy smooth SSH access to your IoT device.
Advanced Tips for Managing IoT Devices on AWS
Once you’ve mastered the basics, you can explore advanced techniques to enhance your IoT setup. Here are a few ideas:
Tip 1: Automate SSH Connections
Use tools like Ansible or Fabric to automate SSH connections and tasks. This can save you time and reduce the risk of human error.
Tip 2: Monitor Device Performance
Integrate monitoring tools like CloudWatch to keep an eye on your IoT device’s performance. This will help you identify and address issues before they become critical.
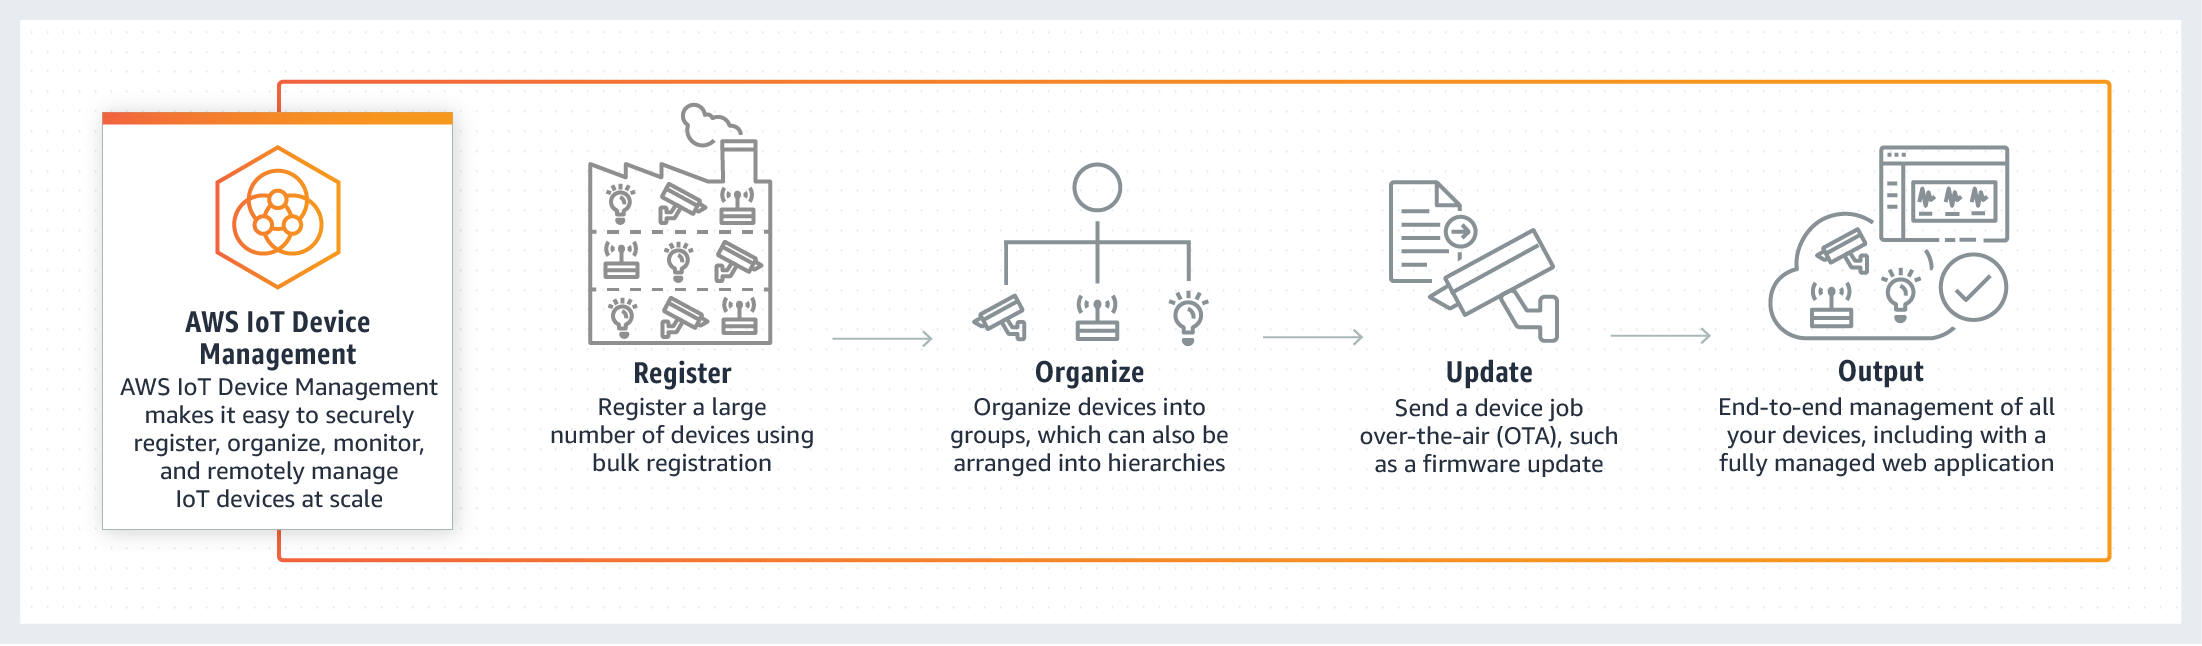
Tip 3: Explore AWS IoT Core
AWS IoT Core provides a managed service for connecting, monitoring, and managing IoT devices at scale. It’s worth exploring if you’re working with multiple devices.
Conclusion and Next Steps
Remotely SSH to IoT device AWS example isn’t just a technical skill—it’s a powerful tool for managing and securing your IoT projects. By following the steps outlined in this guide, you can set up a secure and efficient connection to your devices.
So, what’s next? Here are a few suggestions:
- Experiment with different IoT devices and AWS services
- Join online communities to learn from other developers
- Share your experiences and insights with others
Remember, the world of IoT and AWS is vast and full of possibilities. Keep exploring, keep learning, and most importantly, have fun! If you found this guide helpful, don’t forget to leave a comment or share it with your friends. Happy coding!
Table of Contents
- How to Remotely SSH to IoT Device AWS Example: Your Ultimate Guide
- What Is SSH and Why Use It for IoT Devices?
- Benefits of Using SSH for IoT on AWS
- Setting Up Your IoT Device for Remote SSH Access
- Connecting Your IoT Device to AWS
- Establishing a Secure SSH Connection
- Best Practices for Secure IoT SSH Connections
- Troubleshooting Common Issues
- Advanced Tips for Managing IoT Devices on AWS
- Conclusion and Next Steps