Ever wondered how to securely connect your IoT devices using SSH on a Mac? Well, you're in the right place! SSH login IoT is more than just a tech term—it’s a gateway to managing your smart devices safely. Whether you're a tech enthusiast or a beginner, this guide will walk you through everything you need to know about downloading and setting up SSH for IoT on your Mac. Let’s dive in, shall we?
SSH, or Secure Shell, is like a digital key that lets you access remote devices securely. When it comes to IoT (Internet of Things), having a solid SSH setup is crucial. Imagine controlling your smart home devices from anywhere in the world without worrying about security breaches. That’s the power of SSH. And guess what? Setting it up on a Mac is easier than you think.
In this article, we’ll break down the process step by step, so even if you’re not a tech wizard, you’ll still be able to set up SSH login for your IoT devices like a pro. So, grab a cup of coffee, and let’s get started on this SSH journey!
Read also:Did Rick Lagina Passed Away Unveiling The Truth Behind The Legend
What is SSH Login IoT and Why Should You Care?
SSH login IoT might sound like a mouthful, but it’s essentially a secure way to communicate with your smart devices. Think of it as a private conversation between you and your IoT devices, where no one else can eavesdrop. This is especially important in today’s world where cybersecurity threats are more common than ever.
With SSH, you can remotely manage your IoT devices, update their firmware, and troubleshoot issues without being physically present. This level of control is invaluable, especially for businesses or individuals who rely heavily on IoT technology.
Now, let’s talk about why this matters to you. If you own any smart devices—whether it’s a smart thermostat, security camera, or even a smart fridge—having a secure connection is non-negotiable. SSH ensures that your data remains safe and your devices function as intended.
How SSH Works for IoT Devices
SSH operates by creating an encrypted tunnel between your computer and the IoT device. This tunnel prevents unauthorized access and ensures that all data transmitted is secure. When you use SSH to log in to your IoT devices, you’re essentially establishing a secure session that only you can access.
Here’s a quick breakdown of how SSH works:
- Authentication: You need to provide credentials (usually a username and password or a key pair) to gain access.
- Encryption: All data exchanged between your Mac and the IoT device is encrypted, making it unreadable to anyone who intercepts it.
- Secure Commands: Once connected, you can send commands to your IoT device, manage files, and perform various tasks remotely.
It’s like having a secret handshake with your devices, ensuring that only you can interact with them.
Read also:David Muir Wedding Behind The Scenes Of Love Media And Family
Why Use SSH for IoT on Mac?
Mac users are in luck because macOS comes pre-installed with SSH capabilities. This means you don’t need to download any additional software to get started. All you need is the Terminal app, which is already on your Mac.
Using SSH for IoT on a Mac offers several advantages:
- Security: As we’ve mentioned, SSH provides a secure connection, which is essential when dealing with sensitive data.
- Convenience: With SSH, you can manage your IoT devices from anywhere in the world, as long as you have an internet connection.
- Efficiency: SSH allows you to automate tasks, making it easier to manage multiple devices simultaneously.
For Mac users, SSH is a no-brainer when it comes to IoT management. It’s easy to set up, secure, and incredibly powerful.
Getting Started with SSH on Mac
Before you dive into setting up SSH for your IoT devices, there are a few things you need to prepare. First, make sure your Mac is updated to the latest version of macOS. This ensures that you have the latest security features and bug fixes.
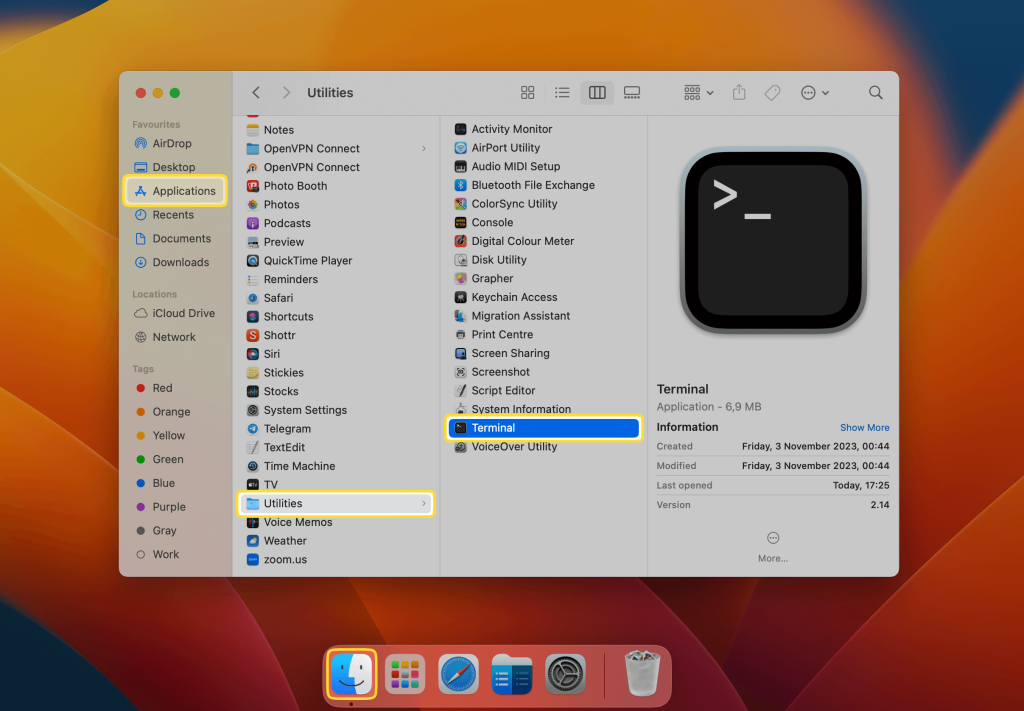
Next, locate the Terminal app on your Mac. You can find it by searching for “Terminal” in Spotlight or navigating to Applications > Utilities > Terminal. Once you have the Terminal open, you’re ready to start configuring SSH.
Here’s a quick checklist to get you started:
- Ensure your IoT device supports SSH.
- Find the IP address of your IoT device.
- Make sure both your Mac and IoT device are connected to the same network.
With these basics in place, you’re ready to move on to the next step.
Downloading SSH Clients for Mac
While macOS comes with built-in SSH capabilities, some users prefer using third-party SSH clients for added features and ease of use. If you’re one of those users, there are several great options available.
Popular SSH Clients for Mac
Here are some of the top SSH clients you can download for your Mac:
- Termius: A user-friendly SSH client that offers both free and paid versions. It’s great for beginners who want a simple interface.
- PuTTY (for Mac): A classic SSH client that’s widely used across platforms. It’s free and offers advanced features for power users.
- SecureCRT: A robust SSH client that’s perfect for professionals who need advanced security features.
Each of these clients has its own strengths, so choose the one that best fits your needs. If you’re just starting out, Termius is a great choice due to its simplicity and ease of use.
Setting Up SSH for IoT Devices
Now that you have your SSH client ready, it’s time to set up SSH for your IoT devices. This process involves a few key steps, but don’t worry—it’s not as complicated as it sounds.
Step 1: Find Your IoT Device’s IP Address
Every IoT device connected to your network has a unique IP address. You’ll need this address to establish an SSH connection. To find your device’s IP address, check the device’s settings or consult the user manual.
Step 2: Enable SSH on Your IoT Device
Not all IoT devices have SSH enabled by default. You’ll need to log in to your device’s admin panel and enable SSH. Again, refer to the user manual for specific instructions on how to do this.
Step 3: Connect via SSH
Once SSH is enabled on your IoT device, you can connect to it using your Mac. Open the Terminal app and type the following command:
ssh username@ip_address
Replace “username” with the username for your IoT device and “ip_address” with the actual IP address. You’ll be prompted to enter a password, and once you do, you’ll be connected!
Advanced SSH Techniques for IoT
Now that you’ve got the basics down, let’s explore some advanced SSH techniques that can take your IoT management to the next level.
Using SSH Keys for Authentication
Instead of using a password, you can use SSH keys for authentication. This method is more secure and convenient, as you won’t need to enter a password every time you connect.
To set up SSH keys, follow these steps:
- Generate a key pair using the Terminal command: ssh-keygen
- Copy the public key to your IoT device using the command: ssh-copy-id username@ip_address
- Test the connection by logging in without entering a password.
SSH keys are a game-changer when it comes to security and convenience. They’re definitely worth the extra setup time.
Common Issues and Troubleshooting
Even with the best preparation, issues can arise when setting up SSH for IoT devices. Here are some common problems and how to fix them:
Problem: Connection Refused
This usually happens when SSH is not enabled on your IoT device. Double-check that SSH is enabled and try connecting again.
Problem: Authentication Failed
If you’re getting an authentication error, make sure you’re using the correct username and password. If you’re using SSH keys, ensure that the public key is correctly copied to your IoT device.
Problem: Slow Connection
A slow connection can be caused by network issues or a weak internet connection. Try restarting your router or switching to a wired connection for better performance.
Security Best Practices for SSH IoT
Security should always be a top priority when dealing with IoT devices. Here are some best practices to keep your SSH connections secure:
- Use strong, unique passwords or SSH keys for authentication.
- Disable password authentication if you’re using SSH keys.
- Regularly update your IoT devices’ firmware to patch security vulnerabilities.
- Limit SSH access to trusted IP addresses only.
By following these practices, you can significantly reduce the risk of security breaches and ensure that your IoT devices remain safe.
Conclusion: Take Control of Your IoT Devices with SSH
SSH login IoT is a powerful tool that every Mac user should know how to use. Whether you’re managing a smart home or running a business, SSH provides the security and convenience you need to stay connected to your devices.
Remember, setting up SSH is just the beginning. As you become more comfortable with it, you can explore advanced techniques and features to further enhance your IoT experience.
So, what are you waiting for? Start exploring the world of SSH login IoT today and take control of your smart devices like never before. Don’t forget to share this article with your friends and leave a comment below if you have any questions or feedback!
Table of Contents
- What is SSH Login IoT and Why Should You Care?
- How SSH Works for IoT Devices
- Why Use SSH for IoT on Mac?
- Getting Started with SSH on Mac
- Downloading SSH Clients for Mac
- Setting Up SSH for IoT Devices
- Advanced SSH Techniques for IoT
- Common Issues and Troubleshooting
- Security Best Practices for SSH IoT
- Conclusion: Take Control of Your IoT Devices with SSH